Royal Stamp Blog
Royal How-To Guide: Removing Vinyl Decals and Stickers
When I was a kid, I absolutely loved stickers. I loved collecting them, showing them off and well, sticking them. This of course was a nightmare for my parents who would find big, ugly stickers stuck to the furniture, walls, windows and anywhere I thought looked "nice". The solution to this problem? Sticker books! This gave me a new and acceptable place to stick and collect my stickers but did not solve the problem from my previous attempts at "interior decorating". My parents were left to deal with half-ripped stickers, residue and damage to various surfaces around the home. If only they had known what I know now!
Fast-forward to the present and I am the Lead Sign Installer here at Royal Rubber Stamp. As a sign installer, I am tasked with not only the installation of signs and decals, but often the removal. The removal of old signs and decals can at times be one of the trickier parts of the job, particularly when trying to do so while limiting and/or preventing damage. In my nearly nine years of installing and removing signs and decals, I've learned some tricks that make my life a little easier. In the video below, I share some of those tricks so you can learn how to remove vinyl decals and stickers with ease!
For more tips, tricks and inside looks at Royal, be sure to check out our other videos on YouTube!
Connect with Royal. Follow us on Twitter!
The Right Kind of Ink for the Right Kind of Job
This blog post will talk about the different types of ink that we carry and how they are best used. Why is it important to select the correct ink? Choosing the wrong ink may cause your imprint to wash out from moisture or just sit on top of the surface and never dry. If you are imprinting on a surface other than normal non-gloss paper please let us know so that we can recommend the right product for you. Please note that if you are not using water based ink you will most likely need to have your stamp made out of a special rubber or the ink will cause the normal polymer die to deteriorate much faster.
The most common ink that we sell to our customers is water based which works well if you are imprinting on non glossy paper. Water based ink is used in our Trodat self inking stamps and standard stamp pads. This type of ink does not work on non-porous surfaces as it will not dry and will smudge even if you give it a very long dry time.
If you are imprinting on glossy paper or a non-porous surface like plastic or metal, we recommend that you use hi-seal ink. Hi-seal ink dries faster so it is great for imprinting on photographic paper, glossy loyalty cards and metal parts. It is not appropriate to use on human skin.
UV ink is typically used by people in the special event industry or night clubs to imprint on skin for re-entry purposes. UV Ink glows under black light. It is fast drying and alcohol based so you will need the stamp die made out of a special rubber.
Fabric ink is meant to be used on textiles and will last many washes before fading. It is important to wash your clothes first before imprinting or the ink will not set properly.
If you don’t find an ink that works for you let us know what your application is and we may have other marking solutions for you. Give us a call. We love a challenge!
Royal How-To Guide: Choosing the Right Plugs or Anchors
In the sign industry, we use a wide variety of tools, hardware, glue, tape and anchors to install our signs. During my time with Royal, I've noticed one of the more frequently asked questions when I'm out on installs is, "what type of anchors do you use?". This is a question that does not have one universal answer. The type of anchors I use to install signs depends on a number of different things including the type of surface I am applying to, weight and placement of the sign, how permanent the sign is intended to be, and a variety of different variables that can come up during the install. This blog post is going to cover some of the more common anchors and when and how they should be used. So whether you're hanging a photo in the bedroom or a chandelier in the lobby, this may help answer some of your questions.
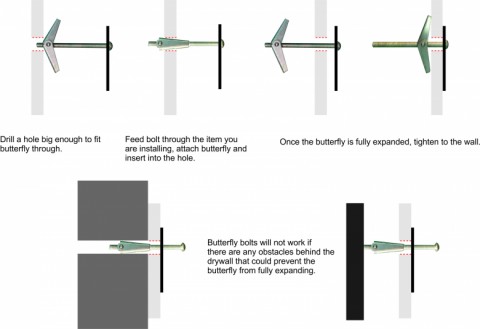
Butterfly Bolts:
+ Works great with any hollow wall
+ Recommended for any install that will be suspended from a drywall ceiling
- Requires a rather large hole. Drill in the wrong location and you'll end up with a large hole to patch
- Once they're up, they're up for good. Bolt can't be removed without losing the butterfly
- Hit a stud or anything behind the wall and the butterfly won't work
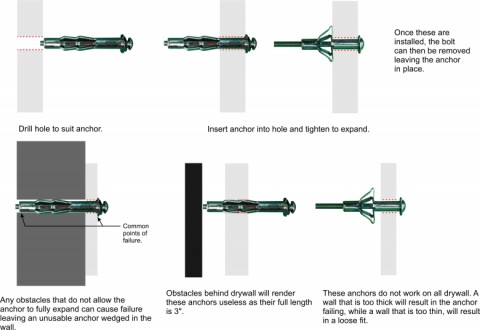
Caddy Anchors:
+ Works well with hollow walls
+ Once installed, bolts can be removed and replaced
- Weak. These have a tendency to fail quite often while screwing them in place.
- Their 3" length requires a lot of extra space behind the layer of drywall
- Needs almost a perfect fit. Drywall that is too thick will break them on installation, drywall that is too thin will leave them with a loose fit.
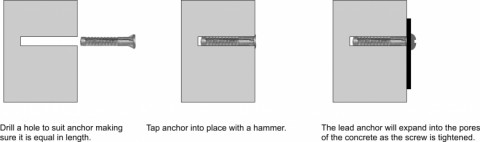
Lead Anchors:
+ To anchor into concrete, cinder blocks, bricks and any other solid walls
+ Easy to use
+ Screws can be taken out and screwed back in at any time
- Does not work with drywall or any hollow walls
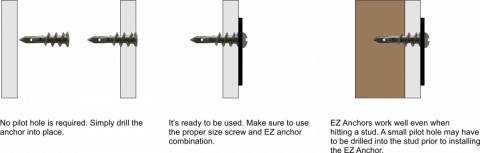
EZ Anchors:
+ Great for drywall use.
+ Easy to use. No pilot holes necessary; simply screw it directly into the wall.
+ Strong. Hang up to 50 lbs.
+ Removable. EZ Anchors can easily be backed out.
+ Works even when you hit a stud.
- Not for concrete or solid walls.
- If you over tighten a screw, they can fail and loosen from the wall.
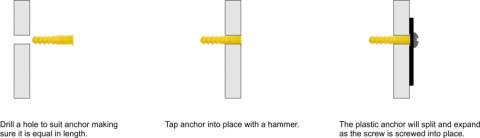
Plastic Anchors:
+ Easy to use
+ Affordable when compared with other anchors
+ Can be used with most walls and surfaces
- Only for light weight applications
- Not easy to remove once they are in
Follow Royal on Twitter @RoyalEdmonton
Royal How-To Guide: Change the Date on Daters Without Getting Ink on Your Hands
One of the main concerns that our customers have with dater stamps is that they sometimes get ink on their hands when changing the date. For ourselves this is just part of the job but after awhile you learn some tricks and we have created a video to show you how to change the date on daters without getting ink on you hands.
The Benefits of Dye Sublimation
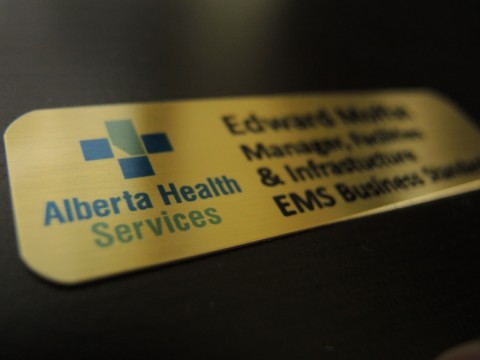
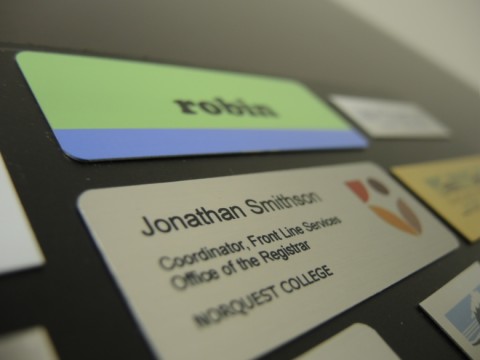
Back in 2012, Royal Rubber Stamp & Sign Co. set out to manufacture all of Alberta Health Services' employee name tags. The job called for a durable, easy to clean and easy to read tag. Dye sublimation was the manufacturing method of choice for all of the over 8,000 tags! After reading this, it will be easy to see why. These are the benefits of dye sublimation!
What is dye sublimation?
Dye sublimation is the process of applying an image to a medium (specially coated ceramics, metals and plastics) using sublimation ink, heat and pressure. Because sublimation ink is unique in its ability to convert from a solid to a gas without going through a liquid form, it is able to print directly INTO materials rather than sitting on the surface of a material like most inks.
The benefits.
Because dye sublimation prints sub-surface, the end result is a very durable, virtually scratch and water proof print. When done properly, the colours in a dye sublimation print will be rich and vibrant. Photographs, in particular, sublimate quite well.
What can be dye sublimated?
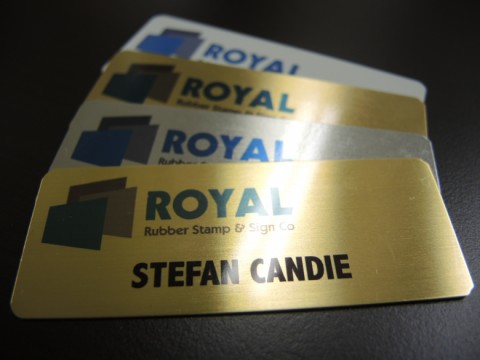
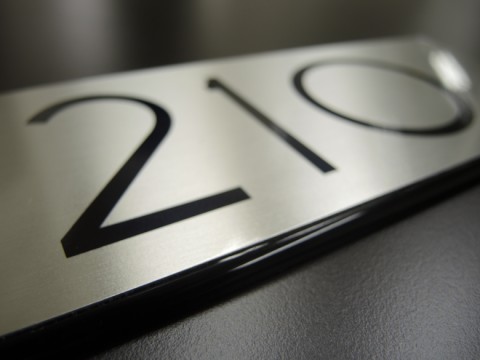
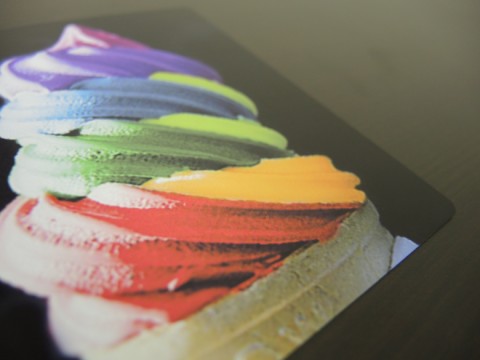
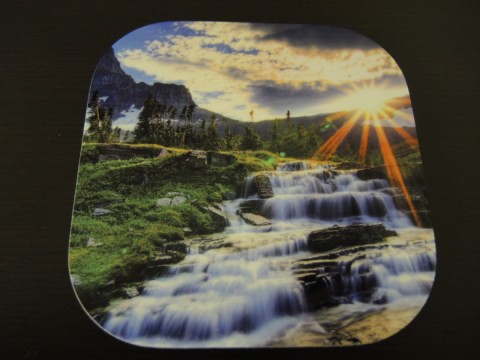
Because dye sublimation is a unique process that requires material with a thin coating of polyester, not just anything can be dye sublimated. With that being said, there are a wide variety of dye sublimatable ceramics, metals and other materials available. Whether you're looking for custom name tags, coasters, small signs, mouse pads, tiles or any other personalized item, Royal Rubber Stamp's customer service staff can help you find what you're looking for.
Below are some samples of dye sublimation:
Interested in seeing more pictures of some of our work? Visit us on Flickr! > http://www.flickr.com/photos/97766255@N05/